Solder/How to Solder
How To Solder with a Soldering Iron
As with all things, practice makes perfect.
Many become frustrated with their attempts as soldering. The usual suspects are an iron which is not suitable, or is not hot enough for the soldering task. Another common issue is old solder with weak flux. A third possibility is materials which are incompatible with soldering.
A better, hotter iron, with new solder or additional flux applied to the work go a long way to improving the results. Since modellers tend to solder copper and copper alloys, incompatible metals are unlikely.
How to Solder: The Rules
Yes, there are rules. Following them makes the task go better. You want to achieve a high quality of workmanship when soldering.
- Work must be clean
- Clean and tin the iron
- Apply flux to work as needed
- Apply the iron to the work
- Apply solder to the work, not the iron. If possible, apply solder opposite the iron
- Allow the solder to flow into the joint. Solder will flow toward the heat source
- Do not push the solder around with the iron
- Remove heat and allow to joint to freeze. If the work moves, a cold solder joint may result
Unfortunately, many demonstrations of soldering on the internet demonstrate poor techniques. Inadequate heat, pushing the solder, acid flux.
Helpful videos
The following videos may be helpful when soldering:
- Resistance soldering brass demonstration
- Solder removal using de-soldering braid
- Resistance Soldering Connectors to Semirigid Flexible Coax
- Soldering for Electronics
The Soldering Process
Generally speaking, all types of soldering follow the same basic steps:
- Clean the parts being joined.
- Remove all coatings, paint, grease, oil, and dirt from the joint. Solder and flux do not clean the joint! Flux will remove corrosion from the metal, but that is it! The surfaces to be soldered should be clean and bright.
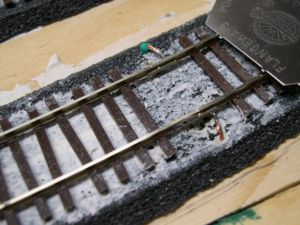
- Soldering feeds to weathered track can be difficult. The rails must be clean and all surface coating removed to bare metal. Flux will also be very useful in attaining a proper soldered joint.
- Remove all coatings, paint, grease, oil, and dirt from the joint. Solder and flux do not clean the joint! Flux will remove corrosion from the metal, but that is it! The surfaces to be soldered should be clean and bright.
- Physically mate the parts.
- The joint should be strong enough (if possible) to stay together without solder. Solder is not intended to provide a lot of mechanical strength!
- Stabilize the work so it cannot move during the soldering process.
- You will be pressing on the joint with the soldering iron, so it must be restrained. You can use a "third hand" rig, with alligator clips on swivel arms, you can prop it up or weight it down, or otherwise keep it from moving.
- If you will be using flux, this is the time to apply some onto the work.
- Heat the work, not the solder
- Make sure the iron is hot. Unwind a few inches of solder from the spool. Do not cut it, just unwind a bit! Tin, using fresh solder, the tip of the iron. Ensure sure the tip is 'shiny' with molten solder. You may need to first wipe the tip to clean off the dross, then add solder. The tinning process aids in heat transfer by using liquid solder to increase the surface area to improve heat transfer from the iron.
- Apply the iron to the joint. Make sure as much of the iron's surface (part of the reason for tinning the iron) as possible is touching the joint. Make sure BOTH parts of the joint are heated!
- Solder: Applied to the Work, Not the Iron!
- After a second or so of heating, apply solder to the work opposite the iron. If things go well, the solder will melt and flow into the joint. Keep adding solder to the joint until you see it 'surfacing' at the edges of the joint. A small amount of solder is all that is needed. Two seconds is about the maximum time you should need to complete this process.
If there is no wetting action or the solder will not melt and flow, there is a problem. Your iron may not be hot enough or corrosion prevents the solder from wetting and flowing into the joint. Clean the joint, apply flux, and try again.
- DO NOT apply solder to the iron; DO NOT push the solder around with the iron. The solder must melt and flow into the joint!
- Allow the solder to cool (freeze) by removing the heat source without disturbing the work. If the solder is still molten you may end up with a misaligned part or other issues.
- This is usually easy to see: the shiny, molten appearance of the solder turns more of a dull silver-gray.
- You can accelerate this cooling by gently pressing the tip of a small screwdriver to the joint. This works because the screwdriver is absorbing the energy, and as the screwdriver is heated, the solder is cools (faster than if the heat just dissipates into the air).
A commercial video (free for the downloading) showing how to solder turnouts using Fast Track brand jigs for PC-board tie turnouts is available at HandLaidTrack
The demonstrator has good technique but uses acid flux (not recommended) to good effect, and does show the problems of corrosion if the acid is NOT neutralized! The application of sandpaper and some elbow grease is very effective at preparing the copper for soldering. As noted above, the metal should be clean and bright.
On wire, where you will not be able to wash off the acid nor rinse with a baking soda solution, do NOT use Acid Flux! Despite comments to the contrary, you will not be able to entirely remove/deactivate the acid. With stranded wire, the acid will wick into the bundle and begin destroying the wire from the inside.
Also shown is an example of trying to solder on a dirty surface, with the solder 'beading up' and not flowing properly. Other examples show how solder should flow into a joint.
During the 'how to solder trackwork' demo the demonstrator does tell you to do one thing, but demonstrates a slightly different technique: he starts by holding the tip of the iron on the base of the rail, but after a second slides it so it touches both the rail and the PC board tie - necessary to heat both parts of the joint when there might be a slight gap between them. He does push the solder around a bit with the iron, but the joint is hot, the solder is liquid, and the solder flows into the joint, it does not lie on the surface!
The largest "Building Turnouts" video is 201 Megabytes, so guide yourself accordingly.
Tips on Soldering Different Things
Electrical Wires
- Since wires are covered with insulation, the first step is to strip 1/2 to 3/4 inch of insulation from each wire. Cleaning is not usually necessary, since the wire has been protected by the insulation. If possible, cut the first inch off the wire before stripping to eliminate any oxidation which may have occurred.
- Make a secure mechanical connection. There are several ways of joining the wires together:
- Line up the stripped ends together and twist them together. This is similar to preparing the ends for using a wire nut.

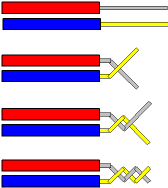
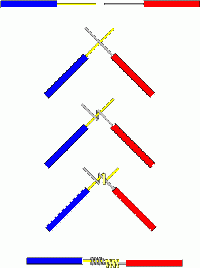
- Cross the stripped ends of two wires at 90 degrees, about half-way down the stripped end. Then wrap the free end of each wire around and around the remaining stripped portion of the -opposite- wire. This will result in a joint that is in line with the remaining lengths of the wires.

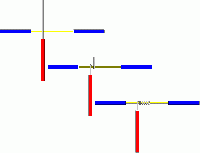
- Remove 3/4" of insulation from the center of a length of wire. Strip the end of the joining wire, then wrap the entire stripped end around and around the stripped center section. This results in a "T" shaped connection.

- Line up the stripped ends together and twist them together. This is similar to preparing the ends for using a wire nut.
- Stabilize the joint so it won't move.
- In some cases, if the joint is mechanically secure enough, you can place tension on the wires with the soldering iron itself.
- Apply some flux, if needed. With older wires, flux can be the difference between successful and unsuccessful soldering.
- If you are having trouble getting the solder to flow, flux can really help.
- Heat the joint.
- Apply solder to the joint.
- Always apply solder opposite to the iron whenever possible.
- Allow the joint to cool without moving.
Tinning Wires
Tinning is the process of adding solder to the work prior to soldering. It can make the job much easier.
Stranded wires can be tinned prior to twisting them together. A quick application of heat and a little solder and the joint is done. This is also an excellent method of preparing track feeders for installation, as it speeds the process and can eliminate excess solder. By tinning all the wire strands are kept together and can be formed to match the rail. Solid wire can also be tinned in this application. When ready, a drop of rosin, add heat, and the feeder is soldered in place.
What Not to Tin:
- Stranded wires which will inserted into a clamping device, or which will have a termination crimped on.
An advantage of stranded wire is that it can conform to the shape of a connection when crushed under a screw or clamp type connection. This results in a much better connection than can be achieved with solid wire. Tinning the wire defeats this ability.
Crimp on terminals are designed to create a gas tight connection when crimped on properly. This method is specifically meant for use with stranded wire. During the crimping process (using the correct tool) the wire will conform to the shape created by the crimping tool. If solder flows into the crimp, it has not been properly applied.
In either case, the wire will now have a stiff, inflexible segment. The wire can break at the junction between the inflexible and flexible segments of the wire, as it will be stressed at that point.
Mounting Rail on PC-Board Ties
- Eutectic solder is an excellent choice for this type of work.
A chisel tip works best. Clean the ties and the rail. Fine sandpaper or a wire wheel mounted in a rotary tool works. A file can be used. Remember to cut a gap in the copper foil, or you will have a short circuit.
Apply a small amount of flux. Position the iron so it can heat the rail and the tie, if possible, use the iron to push the base of the rail against the tie. Tinning the iron beforehand allows the solder to form a bridge to conduct heat to the work. The flux should boil, apply a little solder from the opposite side. It should melt and flow under the rail towards the heat source. Remove the iron and let the solder freeze. If you pressed the rail onto the tie with the iron, use a tool to apply pressure before removing the iron.
Properly done, there should be a small amount of solder on either side of the rail, flowing up onto the base of the rail. The entire process should take no more than two seconds.
Adding Details to Brass Locomotives
The best method of doing this is using a resistance soldering rig. They are not cheap, but will make life a lot less stressful.
Resistance soldering uses the metal body, and the part to be soldered on, to complete the circuit. A lead is clipped onto the body. The part to be soldered is held with a tool that is connected to the resistance soldering system's power supply. When the part is positioned correctly, the circuit is completed and energy flows. The metal of the body and the part at the point gets hot quickly, and can be quickly soldered into place. Stopping the energy flow allows the solder to freeze and complete the bond.
For more information, see the American Beauty website here: American Beauty website
Soldering Rail Joiners to Improve Connectivity
This is easiest when done prior to installation, but not always possible. Soldering the joints improves conductivity and strengthens the mechanical joints. Curves laid with flex track are easier, smoother, and less stressful when the sections are soldered together prior to forming and installation.
- Leave an unsoldered joint at intervals, with a slight gap, to allow for expansion and contraction of the track.
Requirements:
- Flux
- Chisel tip iron
- Light gauge solder
- Assorted track laying tools
Heatsinks may be needed, but with a hot iron and good technique, they should be unnecessary. If you are melting ties, you are taking too long, usually caused by not enough heat.
For soldering track, a chisel tip is best, as the rail will draw the heat out of the tip. The larger thermal mass of the chisel tip, and its area, will minimize this. If it takes too long to complete the operation, any plastic ties near the joint may melt or deform. Cold solder joints, or joints with excessive amounts of solder may also result.
Using a light gauge solder allows more precise control over the amount applied to the joint.
Flex track: trim away any ties, trim and file the rails square, and install the joiners. Then butt the second section against the first. If adjustments are needed, now is the time.
Once the two sections are mechanically aligned and connected, prepare the joint for soldering. Apply a small amount of rosin flux to the area of each joint, clean and tin the iron, apply the iron to the joint, and then touch the solder to the joint. The solder should flow and wick into the joint almost instantly. Remove the heat.
It may be easier to flip the track over and apply the heat to the bottom of the rails, directly on to the joiner.
Flextrack and Curves: leave, if possible, a straight section before finalizing the curve. It will be easier to trim, join, and solder. Once the joint is completed, continue to form the curve, adding additional sections as needed. Otherwise kinks and poorly butted joints can occur.
With previously installed track, apply rosin to the joints, touch a hot, tinned iron to the joint and add a little solder. Work from the outside of the rails, if possible.
For sectional track, soldering may be more difficult if the plastic ties surround the joint. A hot chisel tipped iron, flux, speed, and dexterity are the keys. Heatsinks should be used to prevent excessive heat from melting the plastic ties. Any metal device, such as alligator clips, that can be clipped onto the rails on either side of the joint should work. Damp paper towels also work. A narrow chisel tip may also improve access to the joint. Flux and a hot iron minimize the time needed to complete the joint, reducing the ties' exposure to heat.
After the joints have cooled, clean off any excess flux residue, and check for a smooth, proper joint. If there is excess solder, reheat the joint and draw off the excess. For a cold solder joint, reheat the joint to reflow the solder. Application of flux may also improve the joint during the reflow process.
Flux isn't a necessity, but it will make the task a lot easier and cleaner.
Adding Power Feeds to Track
Similar to soldering the joints, except you will be using a light gauge wire to connect the rail to your power bus. This is usually done after the track is laid, from the bottom of the rail. When done in the gauge, care must be taken to avoid causing a lump which will touch the flanges and possibly derail the truck. The secret is to plan your attack so the wire is hidden as best as possible with as little evidence of the connection as possible.


