Digitrax: Making a LocoNet Cable
Summary: Constructing a LocoNet cable is easy with the proper tools, flat six wire cabling and RJ12/RJ25 modular plugs. The crimping tool will strip the proper amount of insulation from the cable. The connectors have stabs to pierce the insulation of the individual wires when the connector is crimped on, as well as a strain relief. A cable can be constructed easily in a few minutes.
|
See the Video. |
Making Your Own LocoNet Cabling
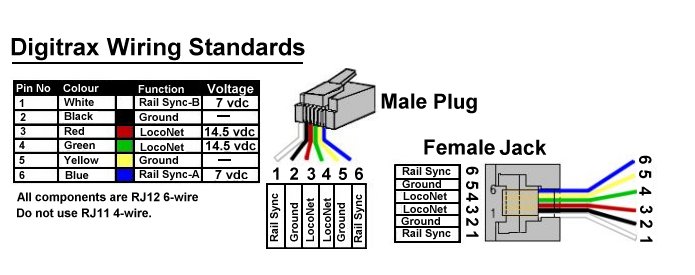
So, if you happen to crimp a male plug onto the end of a cable the wrong way, it won't affect the operation of the LocoNet because the corresponding wire at the other end (blue - white, yellow - black, green - red) both have the same function. (It's not necessary to understand what Rail Sync, Ground, or LocoNet functions are.) However, we highly recommend that you make sure that Pin 1 is connected to Pin 1.... Pin 6 is connected to Pin 6.
Crimp-on connectors are made for use with stranded or solid wire. Use the correct type for the wire you have. The wrong type will result in cable problems later.
Note: In order to keep the Pin 1 to Pin 1 orientation, there is a twist in the cable. Pin 1 is the white wire.
Actually, what we do is crimp one of the male plugs with the tab on top of the cable and crimp the other male plug with the tab on the bottom of the cable. The Digitrax manual shows it something like this:
White is Right when the tab is down and the contacts are facing you.
Orientation
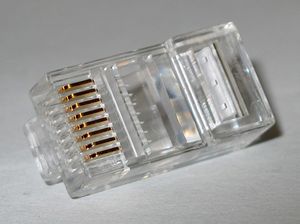
To determine which pin is #1, hold the plug with the tab facing down and the window for the cable facing you. Pin 1 is the leftmost pin. The white wire connects to pin 1. If you get it backwards, the plug at the other end must be aligned the same way so Pin 1 is connecting to the same wire.
A little trick to help keep that orientation before crimping on RJ plugs: Hold the plug tab down so the wires are visible through the plastic. With the cable window facing you, slide the stripped end of the cable into the plug, ensuring the blue wire is on the right and the white wire on the left. Do this at both ends and you're all set!
If you want to verify that a cable is wired correctly, hold both plugs next to each other, tab down. If the colors on both plugs are in the same order (white-x-x-x-x-blue) your cable is crimped correctly. Now use the cable tester and make sure it works electrically!
If you happen to goof up and both plugs show (blue-x-x-x-x-white), don't worry: As long as both ends of the cable match it'll work.
After making a LocoNet Cable, test it with the LT1 LocoNet Tester that came with your set.
Making a Cable
Construcing a LocoNet cable is easy with the correct tools.
Required:
- Flat 6 wire data cable
- RJ12/RJ25 crimp on connectors
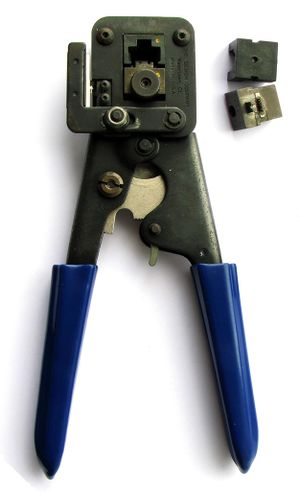
- Crimper
Preparation
It is important that the plugs are the correct type for the wire being crimped onto.
- RJ12: Solid Wire
- RJ25: Stranded Wire
Installing the Plugs
- Cut off the length of cable needed for the application
- Cut the end of the cable square
- The crimping tool should have facilities for both cutting and stripping the cable
- Strip about a ¼" of insulation off the end of the cable. Do not strip the individual wires
- Align the cable in the correct orientation
- Insert the cable into the window, with the white wire toward the left (pin 1)
- Insert the plug and cable into the crimper's die for 6 position plugs
- Squeeze the handles to finish the crimp
- Repeat these steps for the other end of the cable, keeping the white wire to the left.
- When finished, test with the LT1 LocoNet Cable tester
- Repeat the process as needed
Cables Types Not Recommended
Ethernet cables cannot be used, as they have the larger eight position RJ45 plugs, as opposed to the required RJ12/RJ25 six position plugs
Digitrax does not recommend Ethernet cabling, such as Cat4 / CAT5 / CAT5e / CAT6, as the impedances are engineered to work with Ethernet frequencies. Shielded Twisted Pair or serial cable are not recommended. These cable types can cause erratic operations, and reduce the practical length of LocoNet wiring.
The preferred cable is the flat, six wire telephone cable. With this cable runs up to 2000 feet are possible. This type of cable is readily available and not expensive. A specialist electronics store serving technicians and hobbyists is the best source for wire and RJ12/RJ25 connectors. They also sell the proper crimpers for making these types of cables.
LocoNet Wiring: Theory
Digitrax recommends using the 6-wire configuration for the following reasons:
- In a 6-wire flat configuration, the left 3 wires are effectively a "mirror" image of the right 3 wires.
- There are 2 Ground (pins 2 & 5) and 2 LocoNet data connections (pins 3 & 4), so the effective "loop resistance" is lower because of paralleled wires. This lets LocoNet run over greater distances.
- If one ground or signal connection is broken or intermittent, the network can maintain a reliable connection.
- The two outside wires (pins 1 & 6) carry signals of opposite polarity (differential signalling) compared to the master system rail packets; this is called RailSync. RailSync allows LocoNet boosters and other LocoNet devices to be connected anywhere along a cable run. This works even with cable runs of thousands of feet and in the presence of noise and interference.
- The balanced nature of the cable and the way the signal currents propagate in this "RF Quad" configuration generate the lowest possible RFI radiation and EMC susceptibility or inward interference pickup. This is a good thing. This is part of the reason Digitrax LocoNet handily passes the FCC Class B radiation Certification requirements.
LocoNet’s philosophy and architecture allow "free-form" wiring with no termination or "linear-bus" restrictions. You can star, tee, branch, or expand LocoNet in any configuration. LocoNet can be used in any configuration except for a ring. NEVER connect LocoNet back on itself, because pins 1 and 6 should not be connected.
LocoNet Wiring: The Specifics
- LocoNet supports a total cable length of up to 2000 feet depending on actual wire type used and its capacitance.
- No two devices should be connected by more than 1000 feet of cable.
- LocoNet can be split & branched in any free form style.
- The only network current pull-up termination needed is provided by the Command Station. There must be only one Command Station the layout.
- Do not loop LocoNet back on itself. Looping causes RailSync (pins 1 and 6) to be shorted together. This causes it to look like an overload to the driver circuit.
- LocoNet works best when the network cables are 22AWG to 28AWG. The recommended 6 wire flat telephone type ribbon cable is 26AWG.
- Plug and play design using 6 wire telephone type cables and RJ12 jacks makes setting up LocoNet quick and easy.
- Plug in your LocoNet Cables in the same pin orientation around the layout for best results.
LocoNet Wiring: Cables
LocoNet Cables must be reliable and well made, or you may see intermittent connectivity and erratic operation on the layout. If areas of the layout exhibit intermittent issues, bad cables may be the problem. Bad cables on your layout can be very frustrating and are completely avoidable by simply testing each cable before you install it on the layout.
It’s easy to make LocoNet Cables. If you would rather purchase them, ready-made 6-pin male RJ12 to RJ12 cables of various lengths are available from Digitrax and other sources such as DigiKey and Mouser. Be sure to use 6-conductor and not the similar 4-conductor plugs and wires. If you purchase pre-made cables, make sure you test them before installation.
Testing LocoNet Cables
The easiest way to test the cable is to use an LT1 LocoNet Tester. See the main article for more details regarding LocoNet.
Video Demo
Further Reading
- Digitrax Portal
- Digitrax - General information article on Digitrax
- DCC Control for NTRAK Layouts Design and Operational Considerations from the North Raleigh Model Railroad Club. An excellent DCC guide.
- Using Digitrax Devices on a Non Digitrax DCC Controlled Layout
- Standalone LocoNet
LocoBuffer
- rr-cirkits.com - the home of LocoBuffer
- More information on Digitrax Loconet wiring
Software
- JMRI USB Serial information for LocoBuffers
- DCC Software - Software to interactive with the layout
LocoNet Personal Edition
- Digitrax LocoNet Information - Some technical details on LocoNet.
- ↑ Tip from "Railway Bob".


