Re-Motoring a Locomotive
|
See the Video. |
Summary: Replacing an old motor in your locomotives can be a big improvement gain in its operation.
Replacing an old, tired motor, in your car for example, with a nice new crate motor with the latest technology and a lot more power, makes driving your car a lot more fun. The same rule applies to your locomotives. Advances in motor technology such as magnets and manufacturing techniques have created better motors. In this instance, better performance, in terms of current draw and speed control, will be the result.
It is also possible to replace the original motor with a coreless motor. While they are more expensive, they do have their advantages.
All magnets lose energy over time. They lose approximately 10% of their strength over the first year, then about 2% every year thereafter. Temperature can accelerate the process, which was a concern in the early days of command control and analog pulse power throttles. These concerns were later found to be unfounded, as the performance decline was much less than feared.
Re-Motoring
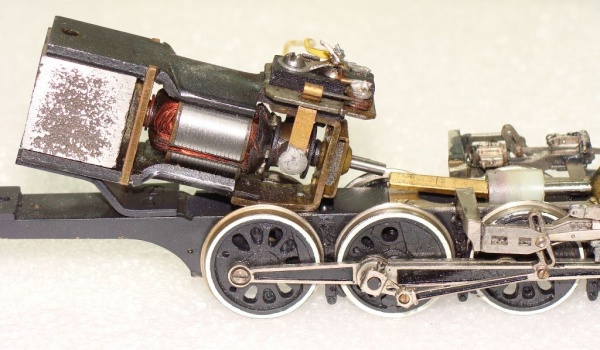
Motor mounted on engine. Locomotive has back head detail, restricting the space available for a motor and flywheels.
Tenshodo open frame motor


Re-motoring in the process by which the original motor is replaced by a newer, better motor. In the case of DCC, replacing older, noisier open frame motors with a modern can type motor can make the model operate more realistically, and use less current in the process.
In this example, a Tenshodo open frame motor in a brass locomotive is replaced with a can motor from NorthWest Short Line. Another advantage (other than lower current and better speed control) is that this motor kit comes with a flywheel.
The image shows a Tenshodo open frame motor. It is an excellent candiate, as it has a loose magnet, which reduces the efficiency of the motor. This increases the current draw.
Before You Start
Remotoring is a process that takes a lot of time and preparation. Both before and after you buy a motor. Choose a motor that will fit, and with a current draw compatible with a DCC decoder. The purpose is to replace old, noisy, high current motors with newer, better motors with less current draw.
This is not an easy undertaking, as the motor must be aligned with the center of the frame, as well as with the drive shaft(s). The better the alignment, the better it will work. Excessive angles can result in cogging, or even jams in the driveline, which could damage or destroy a DCC multifunction decoder.
Important
- No warranties expressed or implied. Undertake such work at your own risk.
Materials Required
Your hobby shop can help you select a motor from a number of suppliers. Basically a motor that is about the same size as the original is what is needed. It is important that it fit into the body without any interference. Steam locomotives are not too hard, as the can have a lot of room in the boiler or cab. Diesels, particularly the narrow hood units, are a little more difficult.
Some suppliers offer a "kit" designed to easily fit into a specific (popular) brand of locomotive. It is also possible to buy new, better gearboxes, with ratios that can reduce the top speed while enhancing low speed operations. Installing thrust washers in an old or new gearbox can also minimize problems caused by too much play between the worm gear shaft and its bearings. Another possible modification is replacement wheel or driver sets. This can cure wobbling, or other wheel related problems, such as plating flaking off or poor gauge. Replacement gears are also available to replace worn or damaged metal or plastic gears.
How the motor is fixed in place is up to you. Double sided tape, screws, or silicone caulk will work.
Choosing a Motor
When choosing a new motor, there are a number of options. The supplier will often supply details such as
- Voltage
- Maximum RPM
- Running Current
- Stall Current
When uncertain which motor to use, select the largest diameter, longest motor that will fit the space available. This will usually provide more than adequate power although peculiar construction or shape/size of some models can make it difficult to shoe-horn in a motor of adequate power.
Stalling is a condition when the motor stops rotating, because the load torque is greater than the motor shaft torque. In this condition the motor draws maximum current but the armature does not rotate. Stall current is the highest current that the motor can draw (under maximum torque load). Stall current is important with older motors, since binding or a jam in the mechanism could result in a stall current which exceeded the decoder's capacity. Modern motors have much lower stall currents, but it is still important to correct any issues with the drivetrain.
With steam engines, the drivers must be quartered properly. With the worm gear removed, the entire engine assembly should roll freely with minimal force using it.
Getting Started
Measure Twice, Order Once
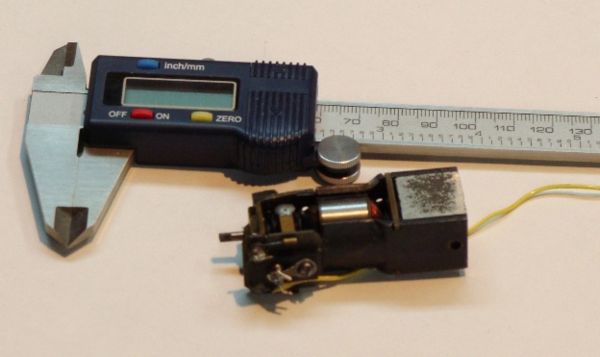
After identifying a candidate for remotoring, disassemble the locomotive so that the motor can be measured. Motors can be round can motors, or 'flat' can motors that are more rectangular in shape.

In some cases, a kit is available to fit a specific manufacturer, and specific type of locomotives. Switchers and narrow bodied units (like most diesels) will not accept a motor with a large diameter in scales such as HO. Steam locomotives will often be able to accommodate a can motor in their boiler. Smaller steam may not have the room in the cab for a large diameter motor, and a flat can will fit.
A caliper will be handy to measure the motor, the shaft diameter, and any openings for clearance. If you plan to install chuff cams or a new gearbox, now would be the time to measure the axles with your caliper.
In this example, the motor sits back into the cab. The space available is limited by the wall of the cab, the rear of the cab, and the opening under the cab. In this case a kit from NWSL meant for Athearn switchers was used.
Remove the Old Motor
Carefully disassemble the locomotive.

Remove the old motor. The motor may be held in with screws, or mounted with a plastic lug.
Check the dimensions of the old motor against the new motor. Make a note of any wires connecting to the motor and where they come from.
Fit the New Motor

NWSL includes a sticky putty like material with the kit. This is used to temporarily mount the motor to check that it will fit. Once a proper position is determined, mark the frame so it can be secured in the same position.
Make sure the body will fit properly with the new motor in place. Make any adjustments needed, or remove materials to make clearances for the motor. Or add some brass stock to make a mount point for the motor.
Once all that is done and satisfactory, the motor can be mounted.
There are several ways of doing this. Double sided tape can be used, as can silicone. Determine the method to be employed, and then prepare the motor and frame by removing any remaining putty, oils, and dirt that may inhibit a good bond.
At this point any metal that may short to the frame should also be insulated. It is important to remember that the motor must be isolated from the frame.
Note about using Silicone Caulk
As the silicone caulk cures, it out gasses acetic acid that can corrode metals. To prevent this problem, cover all openings in the motor with masking tape.
Mounting
When everything is ready, mount the motor. In the example, a silicone caulk was used as the adhesive.

A small amount was applied to a crossmember. The motor was positioned, with the shaft engaging the flexible coupling, and then pressed into the silicone. More silicone was then added to the underside of the motor, between the frame rails, and pushed into any gaps.
At this point, any final alignments must be done. Once everything is satisfactorily in position, use a clamp or elastics to hold the motor in position. It will need to stay that way for several days, until the caulk has cured.
Once cured, it is a good idea to check that the motor is isolated from the frame. An ohmmeter or a DMM will be needed for this test.
Finishing Up
After the silicone caulk has been allowed to cure for a few days (read the instructions on the adhesive for the best results), and a check has indicated that the motor is isolated from the frame, installation of a DCC decoder, or reconnection to an existing unit, can be done. Do not reassemble the unit completely until the motor connections result in the proper operation.
Once the motor is correctly wired, insulate any exposed connections and reassemble your locomotive.
Further Reading
- VH_Royal_Hudson - Conversion of this locomotive to DCC
- Coreless Motor
- Motor
Websites
Wayback Machine: NWSL
Motor Manufacturers
- Canon Ironcore motors
- Canon Coreless motors
- Canon Motor Specifications
- Faulhaber motors
- Mabuchi motors
- Minebea DC motors
- Mitsumi motors
Note
- Motors are available from a number of sources. NorthWest Short Line is mentioned only in the context that it was a part from their catalog that was employed.
- Your results may vary. This is only a guide to replacing the motor. Not an endorsement of a specific manufacturer's products. Your mileage may vary.