FA-2 with Tsunami
Summary: This page details the installation of Soundtraxx Tsunami into a LifeLike/Proto-2000 FA-1.
| See more Decoder Installs | |
|---|---|

| |
| General information | |
| Original Author | User:Terminator |
| Scale | HO |
| Est. Install Time | |
| Date Installed | |
| Decoder Product | DH123D |
| Installed Into Product | Van Hobbies Brass Royal Hudson |
| Keywords Brass locomotive, DCC Conversion, Tenshodo, royal hudson | |
ALCO FA-1 with Tsunami
The subject of this DCC Conversion is an ALCO FA-1, HO scale, made by LifeLike/Proto-2000. As the model number indicates, it is an A unit.
Decoder Used
This install features the Soundtraxx Tsunami decoder, with engine sounds specific to the Alco diesel engines used in the prototype.
The decoder features sound, so a speaker is also installed. This install uses the round speaker supplied by Soundtraxx, along with a Soundtraxx baffle.
Prototype Details
This unit is decorated for Canadian Pacific in their classic Maroon and Grey with script lettering scheme. CP had a number of Alco units, manufactured by their subsidiary, Montreal Locomotive Works, in Montreal. MLW continued to manufacture Alco designs after Alco left the locomotive business. CP purchased 28 FA-1 and 24 FB-1 units between 1946 and 1956. In the FA-2 series they bought 20 FA-2s and 6 FB-2s. Only 7 FPA-2 and 2 FPB-2 units were purchased for passenger service. These units would have block lettering unless repainted in the mid 1960s, when the script lettering may have been applied. Later they would have received the Action Red scheme.
CP used these units in freight and passenger service. Some FPA-2/FBA-2 units were still in operation in the late 1970s/early 80s with VIA Rail. CP used their covered wagons in freight service, including General Motors Diesel Division (GMD) F units, CLC manufactured C Liners, and Alco FAs (in Action Red) into the mid 1970s. With the demise of the Canadian Locomotive Company in June 1969 CP would only have MLW and GMD as locomotive suppliers as their covered wagons were retired and scrapped.
The Alco FA is a shorter, freight oriented version of Alco's PA, widely regarded as one of the most beautiful locomotives ever built. The hood is shorter and the trucks are 2 axles each, compared to the 6 axles (in total) of the PA.
Parts Needed
- Locomotive
- Tsunami Decoder
- Speaker (Soundtraxx PN .. used)
- Speaker baffle, from Soundtraxx, for the PA/FA locomotive.
If you chose to make your own, a stiff plastic would work. Due to the complex shape of the FA body compared to later narrow hood diesels, a pre-made baffle is just a little easier.
Kapton tape was used to secure the decoder and wires. Hot glue was used to hold the capacitor in place as well as securing wires.
Installation
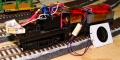
Proto-2000 FA-1 chassis stripped down, factory light board removed
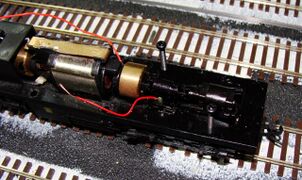
Another view of the chassis, with weight removed
The tool placed on the weight barely clears the flywheel, visually demonstrating the difference 2mm makes when the weight is "decked". Material was removed from the bottom of the weight because the deck would be too thin if removed from the top.
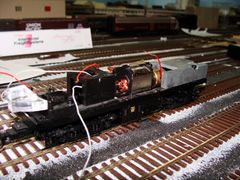
The decoder and wiring temporarily installed to identify the best position on the deck of the weight.
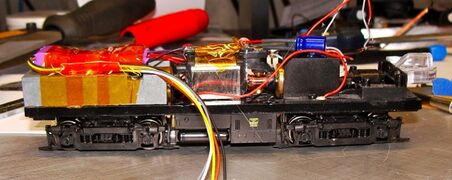
The red wire going to the frame supplies power from the track. The tab was soldered directed to the red wire on the decoder.
Another view of the decoder, held in place with Kapton tape.
Completion of the install


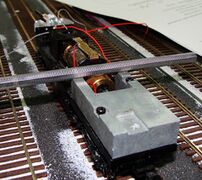
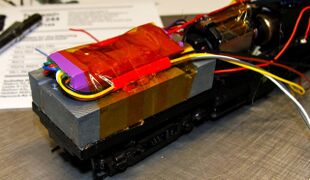
For more clearance, the weight was machined (decked) to remove about 2mm from the height. This would allow the decoder to be place on top of the weight, providing a heat sink, while preventing interference with the speaker cone above it. Prior to machining the holes for the locating pins were deepened to ensure they would still be present when the machine work was done. Since the fasteners are now 2mm too long, the weight was simply bonded to the chassis with contact cement.
The decoder was temporarily affixed to the weight with hot glue for a minute. The wires were routed through a short length of heat shrink tubing on either side of the decoder, and affixed with a blob of hot melt glue.
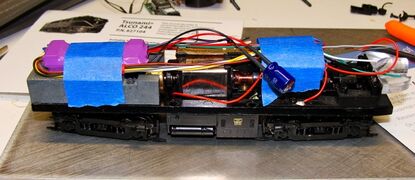
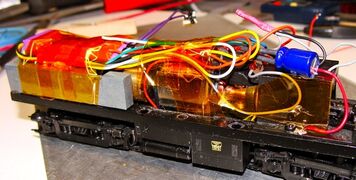
After they were set in place, the decoder was gently popped off the weight and the glue which held it in place was removed. The decoder was then placed into position, and held down with Kapton tape, the amber material you see. Some quick measurements prior to taping the decoder down revealed that there would be several millimetres of clearance between the speaker and the decoder. The wires fastened (previously, using hot glue) beside the decoder prevent them from interfering with the speaker's operation.
The capacitor, which is required for the speaker, was fastened to the housing over the front flywheel with hot glue.
All wires were connected to their respective points, and the unused wires were tucked out of the way. Follow the Tsunami instructions as to wiring. Generally, black and red are the track pickups, with orange and grey connect to the motor.
Speaker Baffle
Assemble the baffle according to the instructions. Contact cement can be used, test for compatibility first. The speaker is bonded using a double sided adhesive gasket.
Before bonding the speaker in place, check the fit of the components. Some filing will be needed to get everything to fit into the body nicely. One issue is the casting for the fan assembly on the roof protrudes into the body and makes for less space for the speaker. Install the speaker so the rear door can open, but try not to allow the speaker to make contact with the body. This could result in distortion or buzzing. Be sure to seal up the joints to enhance the sound.
Wiring The Speaker
The Tsuami has no specific polarity for the speaker.
Before mounting the speaker to the baffle, pass the wires through the holes provided, and solder to the speaker.
Installing the Speaker and Baffle
Install the speaker so the rear door can open, but try not to allow the speaker to make contact with the body. This could result in distortion or buzzing.
After everything is in place, use silicone to seal up the baffle's mating points.
It may be wise to use a connector to make assembly easier, by allowing the speaker (and by extension, the shell) to be disconnected from the decoder.
To increase the clearance, which would allow the decoder to be installed at the rear of the engine, 2 millimetres was milled off the bottom of the weight. This will also require either cutting the mounting screws, or getting screws 2mm shorter, as they pass through the weight to secure it to the frame. An alternative would be to glue the weight in place.
Lighting
Proto 2000 can use any number of lamps, with differing voltages. To be safe, replacing the lamp with a known quantity is a good idea. This model uses a large optical block of clear plastic, with the lamp mounted in the middle. Painting some of the surfaces with a silver or aluminum paint may reduce light leakage while directing it to the headlight and number boards. Other colours could be used to tint the light output, such as Tamiya's Acrylic X-26 Clear Orange.
This installation used a Miniatronics LED, 3mm, installed in the light pipe. It is connected to the Blue (common) and White headlamp leads as per the instructions. The LED is a Yellow Glow type that will simulate an incandescent lamp. The Tsunami Installation Guide (Available on the Soundtraxx website) also has details on using various incandescent lamps.
The light pipe is attached to the front assembly, so it can be removed easily to work on.
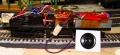
On the track and under power
The headlight assembly will be painted with a Tamiya clear paint later to tint the light output.


References
For more on installing decoders, please see Specific Decoder Installs.
Related FAQs
- No FAQs link to this page.