Wiring Tools
| Basic wiring |
|
| Track wiring |
|
- Using the right tools gets the job done right the first time, but can save many hours in troubleshooting a bad wiring job.
Always remember the adage, "You don't buy tools, you invest in them". Proper tools make the job easier and produce better results.
Overview

- Important
- The safe use of your tools is in your hands. Always use the proper tools and proper safety equipment. Check with the manufacturer for more info.
Remember that sharp tools are safer to use than dull ones.
Basics
First things first. You'll need some basic tools...
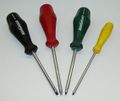
Hand Tools
- Short circuit detector (A home made one can be made for a few dollars using readily available parts - see below)
- Wire strippers. They should be adjusted to avoid nicking the wire. Using a knife to strip wire usually results in a nicked conductor, which ultimately breaks at the nicked point.
- Electrical Tape, various colours are available which aid in identification of wires and circuits.
- Diagonals (sometimes called side cutters or wire cutters). Use tools designed for the metal you plan to cut.
- Linesman's Pliers
- Knife
- Pliers
- Screwdrivers, various sizes and types to fit the fasteners to be used. Remember to use the correct size blade for the screw. Common bits are Robertson, Philips, and the common slot.
- Hammer, if you are also using staples.
- Stapler: With the proper attachments and staples, they can be very useful for fixing wires in place.
- Safety glasses and gloves are not a bad idea.
- Crimpers. If you wish to terminate your wiring with crimp on connectors, you need a pair of crimpers. Don't waste your time with the one that comes in the box as part of a kit. A proper crimping tool not only works better, but is easier to use.

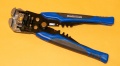
A Heavy-duty wire stripper designed for stripping heavy gauge wire.
Another wire stripper designed for heavy gauge wire.
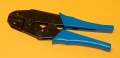
Ratcheting Crimper for Insulated Terminals. The dies are colour coded to match the terminals.
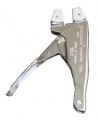
Pliers for use with Scotchlok Insulation Displacement Connectors.
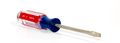
Slot screwdriver
Robertson screwdrivers
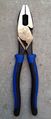
Linesman's pliers
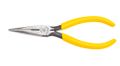
Needlenose pliers
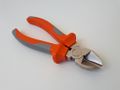
Diagonals
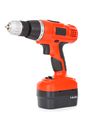
Electric Drill
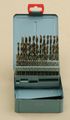
Drill Index


Power Tools
A drill and proper sized bits may be needed to make holes for wires to pass through. Hand drills will work, but an electric variable speed drill is faster. As always, sharp bits are important as the drill bit should cut on its own with just light pressure. A VSR drill (Variable Speed Reversible) can also be used to drive screws with appropriate bits. Impact drivers are very useful for driving or removing screws with the appropriate bit.
Tool Safety
As with all hand tools, they should be inspected to determine they are in good condition. Screwdrivers in particular: Worn, rounded, bent or chipped blades can be dangerous to use. Same applies to dull knives: They are more likely to cut or injure you than a sharp one. Dull bits in your drill mean excessive pressure is needed to force the bit through, which can result in damage or injury should the drill suddenly punch through the material, or jam and cause the entire drill (and you) to violently twist. Loose material should be properly clamped to avoid it suddenly spinning if the bit grabs.
Remember, the fastest way to dull a drill bit is to turn it in reverse.
Electrical/Electronic Tools

- Multimeter, or a Digital Multimeter (DMM).
- RRAmpMeter
A Multimeter is a very useful tool. It is useful enough that should you consider getting one, get a good one. Those cheap analog ones (the meter with the needle) are not a good choice. The best choice is a digital multimeter (DMM). They are almost fool-proof.
Multimeters combine a number of functions in one tool, a voltmeter for measuring voltage, an ammeter for current, and an ohmmeter for resistance measurements. Some may also include a continuity tester as part of their Ohms range with an audible alert.
They come in handy checking for shorts, opens, or continuity. They are also useful for figuring out the wiring on a locomotive or if your power supply is working. They have other applications like check automotive light bulbs, presence of voltage on a fixture, etc. around the house.
They are not really suited to measuring the digital waveform used with DCC voltages. A DMM is designed with pure 50 or 60 Hz sine waves in mind, not a high frequency digital waveform. That is where a RRAmpmeter comes into play.
The RRAmpmeter is a DMM designed from the start for DC and DCC applications. It can measure voltage on the track and current draw. It is a useful tool if you have problems later on. It can also be installed in line to measure current and voltage on an operating layout.
Digital Multimeters
- Main article: Digital Multimeter
Digital Multimeters (DMM) range from cheap to expensive. As a general rule, a low cost DMM may be adequate for low voltages. If you plan to use your DMM for more than just track work, buy a good one. Cheap ones can be a safety hazard when used on high voltage (more than 48V) circuits. As with all tools, cheap tools can be more dangerous than the proper one for the application. A higher quality DMM will not only last longer, but is more accurate as well. Avoid the older analog meters, the ones with the needle that indicates the quantity being measured. The low-cost analog meters introduce their own problems into the equation, making it difficult to diagnose an issue accurately. A DMM appears almost as an open circuit during voltage measurements, where a cheap analog meter can appear as a 20,000-ohm load in parallel with the circuit being tested. Parallax error is another issue that will come with an analog meter.
Low-Cost Electrical Short Circuit Detector
IMPORTANT - Build a Short Detecting Beeper BEFORE You Start ANY DCC Track Wiring!
When doing any wiring on a track segment, you should connect a buzzing short circuit detector to the track block you're working on. This helps detect shorts before soldering a connection, unless you really like having to cut newly connected wires until the short is found! You can build one of these using some cheap electronic parts.

Items needed:
- 18–22-gauge wire (just a few feet)
- 2 Alligator Clips
- Buzzer
- 9-volt battery
To use, you simply attach an alligator clip to each rail you are wiring. Make sure you disconnect your booster - it may show up as a short and/or fry the buzzer. If there is a short between the rails, the buzzer will go off so you'll quickly know there is a problem.
If you have several boosters (or power districts), you will need to move the beeper to each district as you wire. If there are several teams wiring different districts at once, just make them each a buzzer - they're cheap insurance!
Bi-Color LED's as Track Indicators
A bi-colour LED can be hooked up as indicators around the layout as a convenient way to see the power status of sections of the layout. The LED indicates whether a track section is powered up, if "Zero-stretching" Analog mode is being used and its local direction, and can even be used to indicate if the gaps in a reverse section are matched or not.
You will need the following components:
- Two lead bi-colour LED (Any bi-colour LED with two leads will work)
- 1KΩ, 1/4-watt resistor or larger
Connect the 1KΩ resistor in series with either one of the LED's leads to make a "ballasted" (current limited) LED. With a 2 leaded bi-color LED there is no strict polarity to observe, the emitted color depends on the direction the leads are connected to the track. If you plan on using zero-stretching, it's recommended to connect neighbouring sections with the same polarity so the LED will be of consistent color.
Simply connect the "ballasted" LED across the track to indicate the track is powered. If you connect a "ballasted" LED across one of the double gaps of a reverse section the LED will be OFF (unlit) when the gap phasing is matched.
See Also
- Wiring - Primary wiring article.
External Link: Check points for correct crimping